Buying Guides
Top 8 Box Finishings: From Matte Lamination to Foil
Box finishings decide how a buyer judges a box before opening it. We compare foil, emboss and spot UV, with orders from 100 pcs and a sample in about 5 days.
Opening
A buyer forms an opinion of a box in seconds, long before the lid lifts, and box finishings do most of that silent talking. Matte reads calm and modern, gold foil reads premium, and a raised logo invites a fingertip to check the texture.
We make custom paper boxes at our factory in Humen, Dongguan, where we have worked since 1998, and every finish here is one we run on our own presses. The notes below come from that production floor.
Before you commit, you can hold a finish in your hand. We offer a free digital sample in about 5 days, so you can feel the texture and check the color under your own light before the full run.
What Box Finishings Do for a Printed Box
A finish changes three things at once: look, feel, and how long the print survives. Lamination shields ink from scuffs and moisture, foil adds a metallic accent that ink alone cannot match, and embossing gives the surface a shape the eye reads from across a room. The right finish also hides small print variation, because texture and sheen draw the eye away from tiny shifts in tone. The wrong finish does the opposite. Heavy gloss on a dark solid shows every fingerprint, and a deep emboss on thin board can crack the surface. Choosing well among box finishings means matching the finish to the board, the artwork, and how the box will be handled.
Foil Stamping and the Metallic First Impression
Foil stamping presses a thin metallic layer onto the board with heat and a custom metal die, and it remains the fastest way to make a logo look expensive. Gold and silver are the classic choices, while copper, rose gold, and holographic foils suit brands that want a distinct accent. The process works best on smooth coated paper, where the foil bonds evenly and the edges stay crisp. On rough kraft, the same foil can look broken unless the board gets a smooth coating first. Keep fine lines and tiny text out of foil areas, because narrow strokes fill in under pressure. A clean, bold mark always stamps better than a detailed one.
Embossing and Debossing for Touch
Embossing raises a design above the surface, while debossing presses it into the board, and both add a tactile layer that print alone cannot offer. A blind emboss, with no ink or foil, suits minimal brands that want quiet confidence. A registered emboss aligns the raised shape with printed artwork for a more deliberate effect. The board matters here: heavier board holds a deep impression without tearing, while thin paper can split or show the shape through the reverse side. Debossing is the safer choice when the inside of the lid stays visible, since the pressed side faces outward and the back stays clean.
Combo Stamping Where Foil Meets Relief
Combo stamping runs foil and embossing in one pass, so the raised area carries the metallic layer and the two effects reinforce each other. The result is a logo that catches light from every angle and feels raised under the thumb, which is why luxury cosmetics and limited editions favor it. The trade off is precision: the foil and the relief must register exactly, and any drift shows at once. This finish rewards simple, confident artwork and a board heavy enough to hold the impression. Test it on a sample first, because a design that looks fine on screen can prove too fine for the die once metal meets paper.
Spot UV and the Matte Gloss Contrast
Spot UV lays a clear, glossy resin on chosen areas of the design, usually over a matte laminated base, so the coated shapes shine against a soft background. Logos, patterns, and borders gain a raised, glassy edge that invites touch and resists scuffs. The contrast does the work, so the effect is strongest when the coated area is limited: a logo, a line, or a repeating motif rather than the whole panel. Full coverage removes the contrast and wastes the effect. Spot UV also protects the areas it covers, which makes it a practical choice for boxes that pass through many hands before they reach the buyer.
Glitter Dust for Seasonal and Gift Lines
Glitter dust bonds fine reflective particles to an adhesive printed on the design, giving gift and holiday boxes a sparkle that flat print cannot reach. It suits festive packaging, party goods, and youth oriented lines where a playful surface is part of the appeal. The practical concern is shedding: loose particles can drift onto the product or the shelf, so a seal coat over the glitter layer matters, and the boxes should be handled with care during packing. Keep glitter away from food contact surfaces and from products where stray particles could cause trouble. Used with restraint, a small glitter accent reads festive rather than messy.
Flocking and the Velvet Hand Feel
Flocking bonds short, soft fibers to an adhesive coated surface, creating a velvet like texture that reads warm and luxurious in the hand. Gift boxes, jewelry boxes, and cosmetic packaging use it where the unboxing moment matters, because the soft surface slows the buyer down and signals care. The fiber layer adds thickness and a slight grip, so boxes with a fiber surface stack less neatly than smooth ones and need gentle handling during packing. Colors stay deep and matte, which suits dark, rich designs. As with glitter, the adhesive and curing step decide the result, so a sample check is worth the time.
Spot Embossing for Small Details
Spot embossing raises only selected areas, such as a logo, a border, or a small motif, instead of treating the whole panel. It gives a box a tactile focal point at a lower tooling cost than full panel embossing, because the die covers less area. The effect is subtle, which is the point: a raised monogram on a matte lid reads refined, while the rest of the surface stays smooth and easy to stack. Pair it with a light foil or a spot UV accent and the detail gains depth without extra passes. As with full embossing, the board must be heavy enough to hold the impression cleanly.
Die Cut Windows and Clear Film Patching
A die cut window opens a shaped hole in the box and seals it from behind with clear film, so the buyer sees the product without opening the pack. Food, cosmetics, and small electronics use windows to build trust at the shelf, because the product itself becomes the display. The film patch keeps dust out while the window shape frames the item, and a well cut edge reads clean rather than rough. Windows suit rigid and folding boxes alike, though the film adds a step to assembly. Plan the window early, because its shape affects the die line, the print layout, and the insert that holds the product in view.
Matte Lamination as the Base Layer
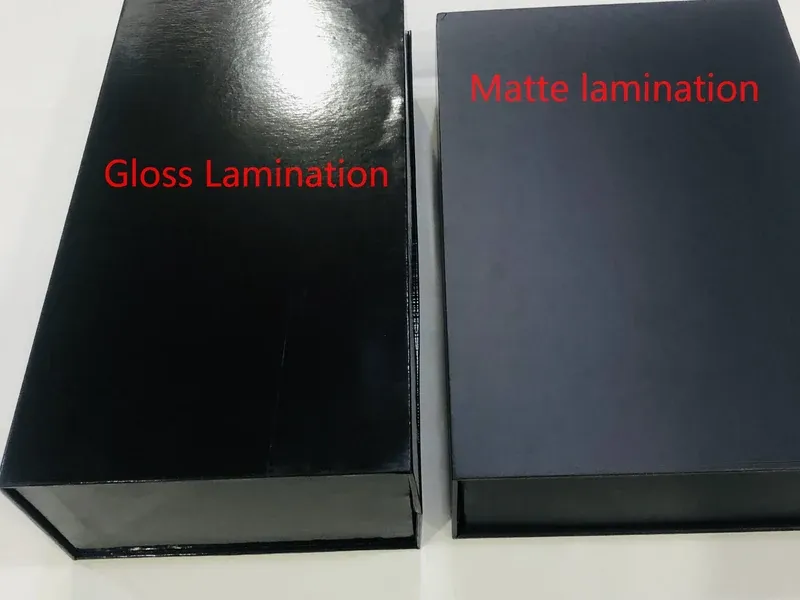
Matte lamination is the quiet base under many of the finishes in this guide. A thin film bonds to the printed sheet, softening glare, protecting ink from scuffs and moisture, and giving the box a smooth, modern hand feel. It also makes spot UV, foil, and embossing read more strongly, because the contrast between the matte field and the bright accent does the visual work. Gloss lamination suits bright, colorful art that should look wet and vivid, but it shows fingerprints and scratches more readily. For most premium boxes, matte is the safer default, and gloss earns its place only when the artwork needs extra shine.
How Paper Weight Changes a Finish
Paper weight decides how far a finish can go. A 157 g coated sheet takes foil and spot UV cleanly and suits folding cartons and sleeves, while board in the 300 to 500 g range holds embossing and debossing without showing the impression through the reverse side. Rigid boxes built on 1200 g greyboard accept the deepest embossing and the heaviest foil coverage, because the thick core resists distortion under the press. Thin board with a deep emboss is the classic failure: the surface cracks, the impression ghosts through, and the box looks damaged. Match the finish to the board first, then refine the artwork around that pairing.
Artwork Rules That Keep Finishes Clean
Finishing rewards artwork built with the process in mind. Keep foil lines bold and well spaced, leave clear space around embossed areas so the die has room to press, and align spot UV shapes with the print beneath them rather than floating free. Small text under six points rarely survives foil or embossing, and fine reversed type can fill in under a heavy coating. Send the die line with the artwork so the factory can check registration before plates are made. A short review of the file before sampling catches most problems, and it costs far less than reworking a die after the first sample comes back wrong.
Sampling a Finish Before the Full Run
A finish that looks right on screen can surprise you in the hand, which is why a physical sample matters more here than in any other part of box buying. The sample shows the true foil tone, the depth of the emboss, and the way matte and gloss play under your own light. We offer a free digital sample in about 5 days for print checks, while finishes that need a custom die take longer and are quoted separately. Check the sample for foil adhesion at the edges, emboss depth on both sides of the board, and any cracking along folds. Approve only when the sample matches what your buyer will hold.
Quality Checks on Finished Boxes
Finished boxes pass through inspection at several stages, because a defect in a finish is easy to spot and hard to fix after packing. Each batch is checked against the approved sample for foil coverage, emboss depth, UV gloss, and color, and our team follows AQL sampling to decide how many pieces to inspect from each lot. Common rejects include incomplete foil transfer, embossing that drifts off register, and UV coating with bubbles or dull patches. Catching these before packing saves the cost of reopening cartons, and it keeps a small defect from reaching a whole shipment. Ask what the inspection covers before you order, so the standard is agreed in advance.
Packing Finished Boxes Without Damage
A good finish can be ruined in the last mile if packing ignores it. Foil and spot UV scratch when boxes rub together, and embossed lids dent when cartons are overfilled, so finished boxes need tissue or dividers between layers and cartons that are not packed past their limit. We pack 100 pcs per master carton as a standard, and each carton stays under 22 kg so handlers can lift it safely and the boxes inside keep their shape. Flat packed boxes travel better than assembled ones for long routes, and a simple corner guard can save a whole carton from edge damage. Packing is part of the finish, not an afterthought.
How Our Factory Handles Finishing Orders
We run finishing in house at our factory in Humen, Dongguan, where we have made custom paper boxes since 1998 in a 5,000 m² plant with about 100 staff. That scale supports an annual output of about US$10 million and a record of 1,000+ cases shipped to 80+ countries for 50+ brands. In house presses mean the print, lamination, foil, and embossing stay under one roof, so registration problems are caught on the same floor where they happen. We also supply FSC-ready board for buyers whose markets ask for responsible sourcing, and every finishing order starts from the same sample approval step.
Choosing Finishes by Product Category
Cosmetics favor foil and spot UV, because shelf appeal drives the sale and the box is small enough for detail work to shine. Food and tea boxes lean toward matte lamination and embossing, which read clean and avoid loose particles near the product. Electronics and rigid gift boxes suit deep embossing and combo stamping, where the weight of the board supports a strong impression. Seasonal gift lines can carry glitter and bold foil, while corporate gifts usually stay restrained with a blind emboss or a single foil color. Start from the product and the buyer, not from the finish catalog, and the right combination of box finishings usually narrows itself to two or three options.
MOQ, Sampling and Production
Orders start at 100 pcs per design, and the unit price falls as the quantity grows, so a first order can stay small while a reorder earns a better rate. A free digital sample ships in about 5 days, and finishes that need a custom die are quoted separately with their own sample timing. We reply within 12 hours and send a full quote within 24 hours, covering price, production time, and shipping. Standard production runs 10-20 working days after sample approval, while complex builds with special finishes or custom inserts take 15-30 working days. A 30% deposit starts production, and every order carries our 60-day quality guarantee. Free design support is available if your artwork needs a finishing review before sampling.
Frequently Asked Questions
Does foil stamping work on kraft board or only on coated paper?
Foil stamps cleanly on smooth coated paper, where the metallic layer bonds evenly and edges stay sharp. Raw kraft is rougher, so foil can look broken or patchy unless the board gets a smooth coating or a primer layer first. For kraft designs, a bold mark with generous line weight stamps far better than fine detail. Check a sample before approving foil on uncoated board.
How deep can embossing go before the board starts to crack?
Depth depends on board weight and fiber direction, so no single safe number fits every box. Heavier board holds a deeper impression, while thin paper splits or ghosts the shape through the reverse side. A shallow, well registered emboss reads better than a deep one pushed to the limit. Your supplier should test the depth on your board and show it on a sample before the full run.
Can spot UV be applied over a matte laminated surface?
Yes, matte lamination is the usual base for spot UV, and the pairing creates the contrast that makes the finish work. The glossy resin stands out against the soft matte field, giving logos and borders a raised, glassy edge. The bond holds when the lamination is fully cured before the UV layer goes on. Check the sample under angled light to confirm even gloss across the coated shapes.
What keeps glitter from shedding off a finished gift box?
A seal coat over the glitter layer is the main defense, locking particles in place so they do not reach the product or shelf. Glitter also sheds less over a limited area than across a whole panel, and when boxes are packed with tissue between layers. Keep glitter away from food packaging and products where stray particles could cause trouble, and inspect the sample as a buyer would handle it.
Can a die cut window be added to a rigid box lid?
Yes, a window can be cut into a rigid lid and sealed from behind with clear film, as on a folding carton. The rigid board holds the window shape well, though the film patch adds an assembly step and the window must be planned before the die line is set. The insert inside should hold the product centered in the opening, so the display reads as intentional.
Does embossing on the lid show through on the inside?
It can, especially on lighter board, where the raised shape outside leaves a matching hollow on the reverse side. Heavier board hides this better, and a paper lining inside the lid covers it completely. Debossing avoids this on the visible face, since the pressed side faces outward. If the inside of your lid stays visible, raise the board weight or add a lining and confirm it on a sample.
Conclusion
The eight box finishings in this guide cover most of what a paper box can do, from quiet matte lamination to bold foil and deep embossing. The best choice is rarely the most elaborate one; it is the finish that matches your board, your artwork, and the way your buyer will hold the box. Start with a sample, check the texture under your own light, and let the physical proof settle the decision. To compare finishes on your own design, Request a Wholesale Quote and tell us which effects you want to test first.